
This guide walks you through how to add new investors (manually or via template), customize how investor information is displayed, and update investor records in bulk. Everything takes place in the Investors tab within the Admin Portal.
Note: This guide focuses on investor management. If you need to set up funds first, please refer to the guide on How to Add, View and Manage Funds in ark.
Jump to a Section
What You’ll Learn
By the end of this guide, you’ll be able to:
-
Add new investors manually or through a template
-
Customize and filter your investor view
-
Export and update investor information efficiently
-
Confirm and review updates with confidence
Who Can Use This Feature
This feature is available to:
-
Basic Admin users
-
Ark Client Admin users
Step-by-Step: Adding New Investors
1. Go to the Investors Tab
Use the left-hand navigation menu to access Investors in the Admin Portal.
2. Click "+ Add New"
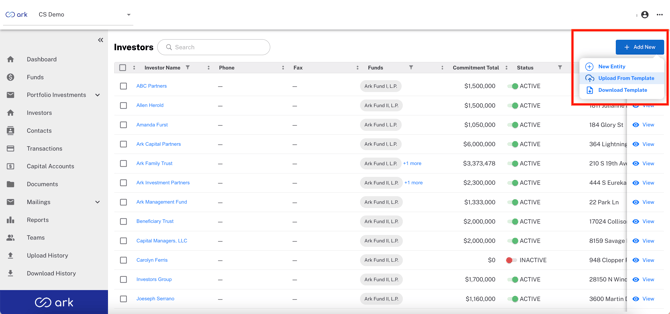
In the top right of the page, click the + Add New button to choose how to add investors.
3. Choose Your Preferred Method
Add Entity (Manual Entry)
-
Select Add Entity to input a new investor directly in the UI.
-
Required fields include:
-
For Individuals:
First Name,Last Name, andEntity Type= Individual -
For Entities:
Investor NameandEntity Type= Entity
-
-
Be sure to link each investor to at least one fund before saving.
-
Use the tabs at the top of the investor record to add wiring or additional details as needed.
Upload From Template (Bulk CSV Import)
-
Click Download Template to access the upload file format.
-
Required fields:
-
For individuals:
investor_firstname,investor_lastname,investor_entitytype,fund_name -
For entities:
investor_name,investor_entitytype,fund_name
-
-
Each row should represent one investor-fund pair.
-
Remove the
uuidcolumn before uploading. -
Once ready, click + Add New > Upload From Template, select your file, and click Upload.
-
Go to the Upload History tab to confirm the status of your upload. If errors occur:
-
Click Download next to the failed upload
-
Review the error file, make corrections, and re-upload
To double-check updates, click View next to any investor to see their full profile.
-
Step-by-Step: Viewing & Customizing Investor Information
1. Go to the Investors Tab
Navigate to the Investors tab using the left-hand menu. This tab is the central location for viewing, managing, and updating investor information.
2. Customize Column Views
Click the gear icon in the column header area to customize what investor fields are displayed. You can:
-
Show or hide fields such as Name, Status, Funds, Commitments, Phone, and Address
-
Reorder columns by dragging them
-
Resize columns to improve visibility
Your layout changes are saved for future sessions.
3. Sort and Filter Investors
To organize the view:
-
Hover over a column header to sort A–Z (up arrow) or Z–A (down arrow). Click again to clear sorting.
-
Use the funnel icon next to column headers to filter by values such as Investor Name, Status, or Investor Type.
4. View or Edit Investor Details
Click View next to any investor to open their detailed record. You can:
-
Edit contact and wiring details
-
View associated funds
-
Add or update any existing fields
Step-by-Step: Exporting & Updating Investor Records
1. Select Investors
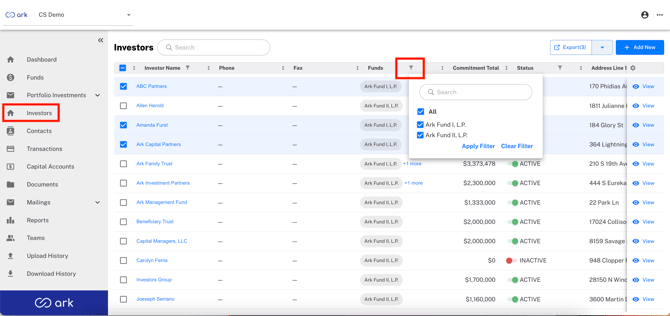
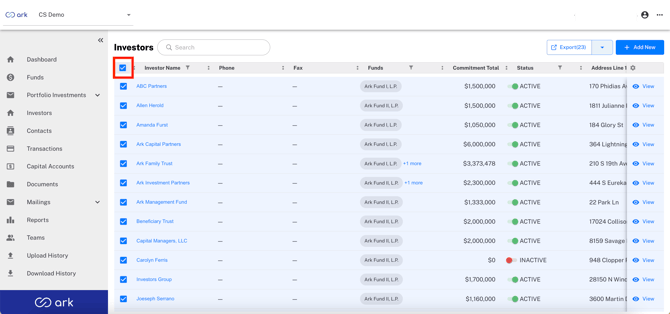
From the Investors tab, use checkboxes to select one or more investor records. To select all, use the checkbox in the header row. You can also filter by fund, name, state/province, or investor type before selecting.
2. Export to CSV
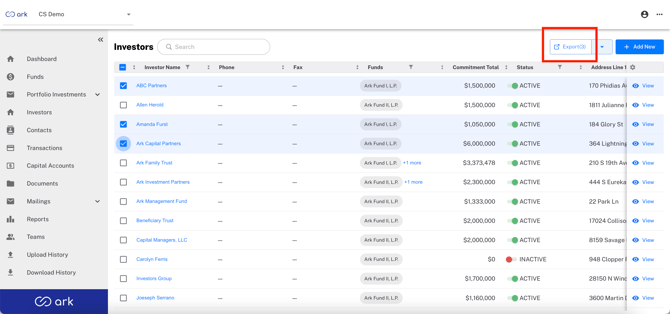
With investors selected, choose Export (#) from the dropdown menu. This creates a .csv file containing all selected investor information.
3. Edit the CSV File
Open the exported file in Excel or a spreadsheet tool and update:
-
Contact or investment details
-
Fund associations (ensure fund names exactly match those in the Funds tab)
If assigning an investor to multiple new funds, create one row per fund-investor pair.
Note: Any updates made will overwrite the existing information for those fields once uploaded.
4. Save & Upload Your File
Once updated:
-
Save the file in
.csvformat -
Go back to the Investors tab
-
Click the plus icon (+) > Upload from Template
-
Select your file and click Upload
5. Verify the Upload
Go to the Upload History tab to confirm the status of your upload. If errors occur:
-
Click Download next to the failed upload
-
Review the error file, make corrections, and re-upload
To double-check updates, click View next to any investor to see their full profile.
Tips & Best Practices
-
Save uploads as
.csvfiles with a single sheet, no formulas, and plain text formatting -
Ensure that field values (like
investor_entitytype,investor_type,investor_legal_type) match accepted terms shown in the template's “List” tab -
For multiple fund assignments, add one row per fund per investor
-
When mailing and tax addresses are the same, enter YES in
tax_address_same_as_mailingto auto-fill -
Before uploading, confirm all investor and fund names match the platform exactly
Maintaining Leading Zeros in Fields (e.g., zip codes):
To retain leading zeros when working in Excel:
-
Rename the
.csvfile to.txt -
In Excel, go to File > Open and change the file type to "Text Files"
-
Use the Text Import Wizard:
-
Step 1: Choose "Delimited"
-
Step 2: Set delimiter to "Comma"
-
Step 3: Select relevant columns and set format to Text
-
-
Finish the import and proceed with your edits
FAQ
Q: Will editing an investor’s details affect their fund association?
A: No, unless you explicitly change the fund assignment in the update process.
Q: Can I preview changes before uploading a CSV file?
A: While there’s no pre-upload preview, the system will report any errors after submission so you can fix and retry.
Q: What happens if I re-upload the same investor with different data?
A: The new data will overwrite the existing fields that are populated in the upload file.
Next Steps
- View the Standard Investor Template and Data Upload Template Guide
- Keep your investor data accurate for clear reporting and fund tracking
-
Use the Upload History tab to stay informed about updates
-
Refer to the How to Add, View and Manage Funds in ark guide for adding and maintaining fund records
-
Leverage filtering and export tools to streamline compliance and communications
If you have any questions or need additional help, please reach out to support@arkpes.com.