
This guide walks you through how to add and update contact records in ark, assign roles and permissions, manage associations with investors and funds, and impersonate contacts to preview their portal experience. You’ll also learn how to bulk upload and maintain contact data using templates.
Note: Contacts are essential for providing LPs access to the ark portal and linking them to specific funds and investors. Each contact must have a unique email address.
Jump to a Section
What You’ll Learn
By the end of this guide, you’ll be able to:
-
Add contacts manually or via upload template
-
Assign contacts to funds, investors, and portal roles
-
Update contact details and associations
-
View the portal from a contact’s perspective using impersonation
Who Can Use This Feature
This feature is available to:
-
Basic Admin users
-
Ark Client Admin users
Step-by-Step: Adding New Contacts
1. Navigate to the Contacts Tab
Go to Contacts using the left-hand menu.
2. Add a Contact Manually
-
Click + Add New > New Contact
-
Fill in the required fields:
-
First Name -
Last Name -
Email Address
-
-
Click Continue to Permissions
-
Use + Add or Remove Investors to assign roles and permissions
-
Click Save
After saving, the contact will be pending approval. Refer to the Going Live with a New Portal in ark guide for steps to approve and send welcome emails.
3. Add Contacts with a Template
-
Click + Add New > Download Template
-
In the template, fill in required fields:
-
contact_firstname,contact_lastname,contact_email,contact_contacttype(Individual or Entity) -
investor_name,fund_name,role_name -
For Entities: use
contact_nameinstead of first/last name
-
-
Delete the
uuidcolumn -
Save as
.csv -
Click + Add New > Upload From Template and upload the file
Use one row per contact-role-fund-investor combination. For multiple roles, duplicate the row and change the
role_name.
Step-by-Step: Assigning Contact Roles & Permissions
Contacts can be assigned to specific roles that control what documents, data, and features they can access. Below are examples of available roles:
| Role | Access Includes |
|---|---|
| Annual Meeting | Documents, Contacts, Investors |
| Capital Call | Capital Calls, Documents, Contacts, Investors, Capital Call Notices & Emails from the system |
| Capital Reconciliation Reports | Capital Accounts, Documents, Contacts, Investors |
| Distributions | Distributions, Documents, Contacts, Investors, View Wire Info, Distribution Notices & Emails from the system |
| Fundraising Contact | Documents, Contacts, Investors |
| K1 | Documents, Contacts, Investors |
| Legal | Documents, Contacts, Investors |
| Primary Contact/Decision Maker | Edit/add contact info, View/Edit/Add Wire Info |
| Quarterly Reports | Capital Accounts, Documents, Contacts, Investors |
| Miscellaneous | Documents, Contacts, Investors |
Only documents tagged to the contact’s assigned roles will appear in their portal view.
Step-by-Step: Updating Contact Information
1. Export Existing Contacts
-
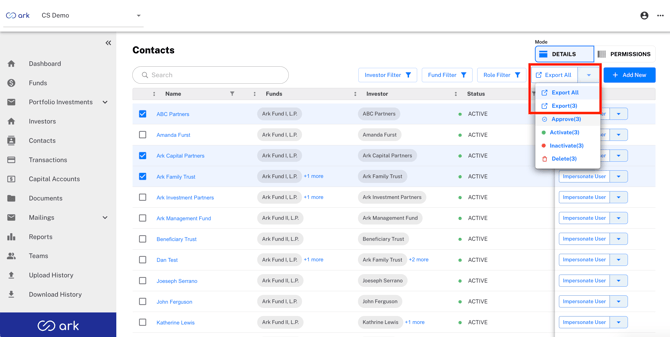
In the Contacts tab, filter and select the contacts you want to update
-
Choose Export (#) from the dropdown menu
-
A
.csvfile will download with current contact details and permissions
2. Update the Template
-
Set the
is_updatecolumn toYfor each row -
For Individual contact types, remove the
contact_namevalue -
For Entity types, use
contact_nameand leave first/last name blank -
To add new roles or fund/investor associations, use additional rows
Want to keep leading zeros in phone or zip code fields? See the Tips section below.
3. Upload the Updated File
-
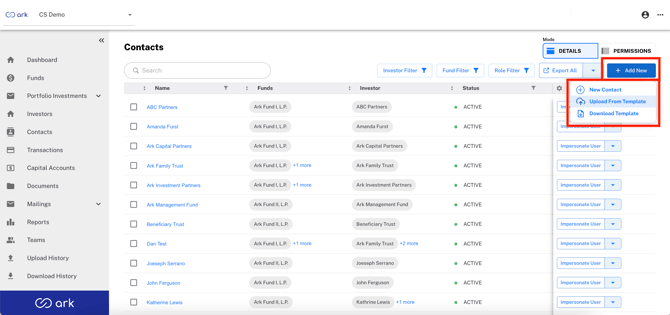
Click + Add New > Upload From Template
-
Select your edited file and click Upload
4. Approve Contact Updates
After upload, a confirmation popup will appear. These updates do not trigger welcome emails for existing contacts. You can confirm changes by clicking View next to any contact in the list.
Step-by-Step: Viewing & Impersonating Contacts
Impersonate a Contact
Admins can view the portal from a contact’s perspective:
-
Go to the Contacts tab
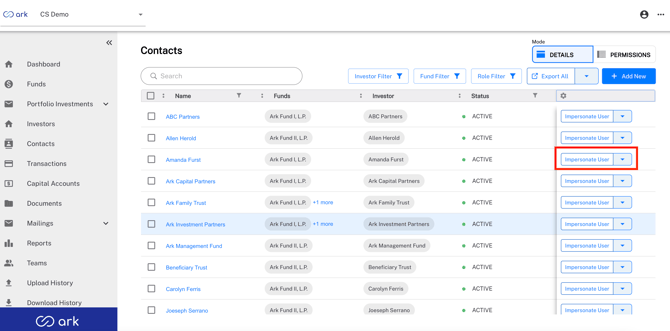
-
Click Impersonate User next to the desired contact
-
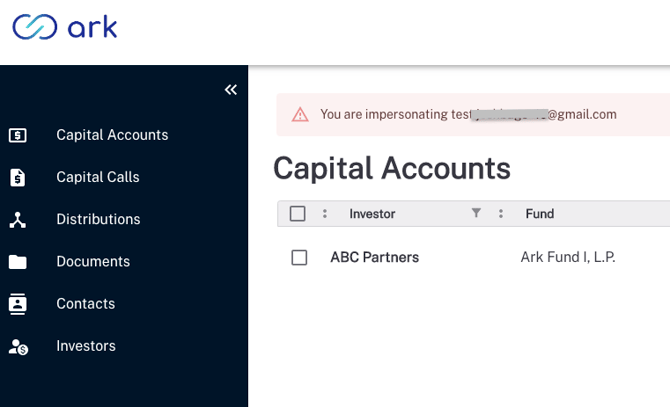
A red bar will appear indicating impersonation is active
-
Click Stop Impersonating to return to the admin view
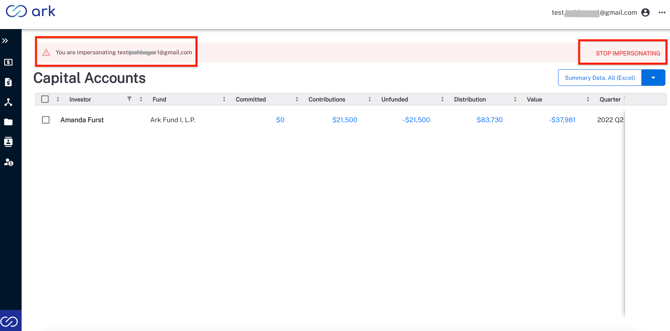
While impersonating, you can preview the contact’s access to documents, distributions, capital calls, and more.
Tips & Best Practices
-
Unique Email Addresses: Each contact must have a unique email
-
Role Associations: Use one row per contact-role-fund-investor combination in the upload file
-
Leading Zeros:
-
Rename the
.csvfile to.txt -
Open in Excel > File > Open > Change to “Text Files”
-
Use the Text Import Wizard:
-
Step 1: Delimited
-
Step 2: Delimiter = Comma
-
Step 3: Format critical columns as Text
-
-
-
Multi-Factor Authentication (MFA): If MFA is enabled, leave phone fields blank so LPs can enter them during login
-
Upload History: Use this tab to review and confirm your uploads
FAQ
Q: Can I assign multiple roles to one contact?
A: Yes - use a separate row per role in your upload file.
Q: What happens if a contact is updated via upload?
A: Their details and associations will be refreshed, but they will not receive a new welcome email.
Q: Can I view what a contact sees in their portal?
A: Yes. Use the Impersonate User feature to preview their exact portal access.
Q: How do I know that my template uploaded successfully?
A: Navigate to Upload History and click Download next to the upload to review any changes that need to be made and re-upload once resolved.
Next Steps
- View the Standard Contact Template and Data Upload Template Guide
-
Approve pending contacts and trigger welcome emails using the Going Live with a New Portal in ark guide
-
Use the impersonation feature to validate contact access
-
Explore How to Add, View, and Manage Funds in ark and How to Add, View, and Update Investors in ark guides to ensure contacts are properly linked
If you have any questions, reach out to us at support@arkpes.com - we're here to help!