
This guide walks you through how to set up transaction types and metrics for each client in Ark, using the Transaction Mapping tab within Client Configuration. These settings determine how data appears in the Transactions page, Capital Accounts page and client reports.
Jump to a Section
What You’ll Learn
By the end of this guide, you’ll be able to:
-
Add and customize transaction types and metrics
-
Understand how transactions and metrics populate Capital Account data
-
Configure how data appears in Capital Account summaries and dashboards
Who Can Use This Feature
Only Ark Client Admin users can edit Transaction Mapping. Navigate to Client Configuration > Transaction Mapping to view or make changes.
Overview: Transaction Mapping
Transaction Mapping allows Ark Client Admins to configure both transaction types and metrics, and organize how they display on the Capital Accounts page (for both Admin and LP portals).
-
Transaction Types: Represent financial events (e.g., Contributions, Distributions). These use the same currency as the fund and default to two decimal places.
-
Metrics: Display reference data such as IRR, MOIC, or dates. Metrics are manually uploaded and use formats like:
-
Percentages:
0.00% -
Dates:
MM/DD/YYYY -
Multiples:
0.00x
-
The Capital Accounts layout includes configurable columns - each column can represent either a transaction-based summary or a metric. Columns may be added, deleted, or edited to adjust:
-
Type: Transaction or Metric
-
Date Range: Quarter to Date (QTD) or Inception to Date (ITD)
-
Label: Column header as seen in the UI
-
Index: Controls the order of columns on the page
Step-by-Step: Adding Transaction Types
-
Go to the Client Configuration for a client.
-
Click the Transaction Mapping tab.
-
Scroll to the bottom of the Transaction Table.
-
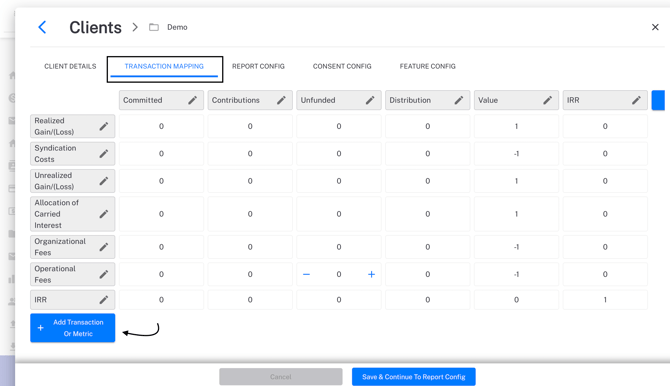 Click the
 +button to Add Transaction or Metric. -
Select Transaction.
-
Enter a name.
-
Indicate how the transaction affects each metric by using
1(positive),0(no effect), or-1(negative). -
Click OK and Save & Continue to apply changes.
Step-by-Step: Adding Metrics
-
In the Transaction Mapping tab, click
+ Add Transaction or Metric. -
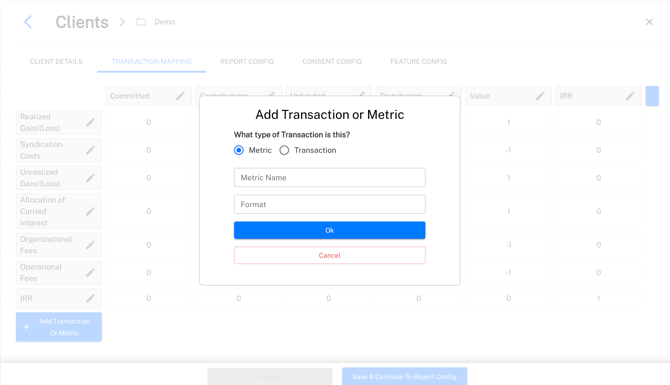 Select Metric.
 -
Enter a name (e.g., IRR, MOIC, Valuation Date).
-
Choose the desired display format:
-
0.00%for IRR -
MM/DD/YYYYfor dates -
0.00xfor multiples
-
-
Click OK to add the metric row.
-
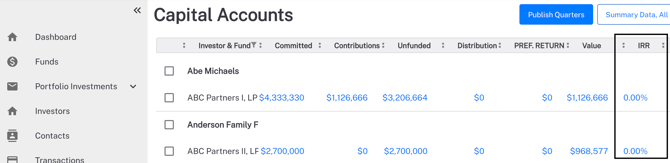 To display this metric on the Capital Accounts page:
-
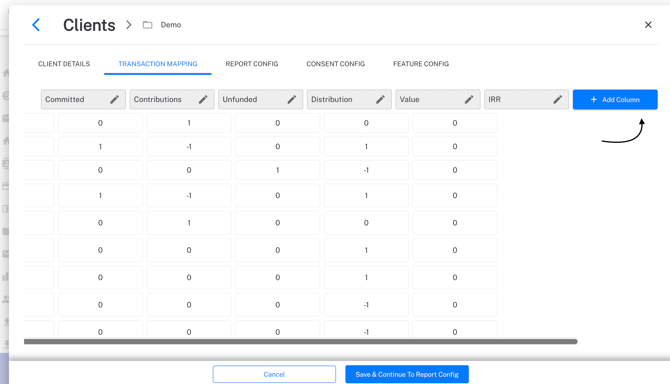 Click the
 +icon in the top-right of the mapping table to Add Column. -
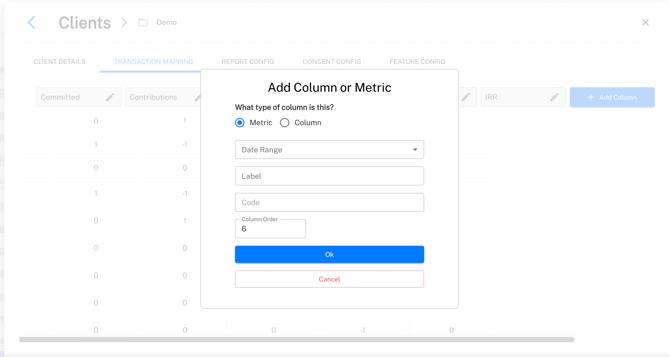 Set the label, choose Quarter to Date or Inception to Date, and define the index to determine column order.
 -
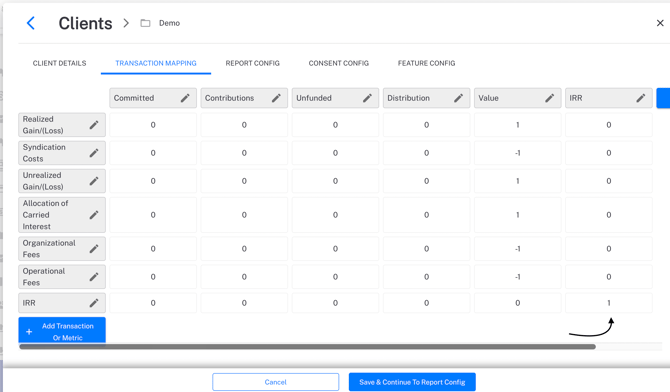 Match the label to the metric name and place a
 1in the corresponding metric row.
-
-
Click Save & Continue to Report Config to apply.
Step-by-Step: Add, Edit, or Delete Columns in Capital Accounts
Columns in Transaction Mapping determine what information is shown to both admin and LP users on the Capital Accounts page and how it is presented.
To Add a Column:
-
Click the
+icon in the top-right of the Transaction Mapping table. -
Choose the column Type: Transaction or Metric.
-
Select a Date Range: Quarter to Date (QTD) or Inception to Date (ITD).
-
Add a Label (this is what displays to users).
-
Assign an Index to control column order.
-
Match the column with the appropriate transaction or metric row.
To Edit a Column:
-
Click the edit icon in the column header to edit its properties.
-
Update the Type, Date Range, Label, or Index as needed.
-
Click Ok and then Save & Continue to Report Config to confirm changes.
To Delete a Column:
-
Scroll to the bottom of the column and select the Delete icon.
- Click Save & Continue to Report Config to confirm changes.
Standard Transactions and Their Effects
The LP Reporting Portal includes 15 standard transactions. Each affects core LP metrics:
| Transaction | Committed | Contributions | Unfunded | Distributions | Value |
|---|---|---|---|---|---|
| Commitment | 1 | 0 | 1 | 0 | 0 |
| Transfer of Commitment | 1 | 0 | 1 | 0 | 0 |
| Contribution | 0 | 1 | -1 | 0 | 1 |
| Transfer of Contributions | 0 | 1 | -1 | 0 | 1 |
| Distribution | 0 | 0 | 0 | 1 | -1 |
| Transfer of P&L | 0 | 0 | 0 | 0 | 1 |
| Interest Income | 0 | 0 | 0 | 0 | 1 |
| Management Fee | 0 | 0 | 0 | 0 | -1 |
| General Expense | 0 | 0 | 0 | 0 | -1 |
| Organizational Fees | 0 | 0 | 0 | 0 | -1 |
| Operational Fees | 0 | 0 | 0 | 0 | -1 |
| Syndication Costs | 0 | 0 | 0 | 0 | -1 |
| Realized Gain/(Loss) | 0 | 0 | 0 | 0 | 1 |
| Unrealized Gain/(Loss) | 0 | 0 | 0 | 0 | 1 |
| Allocation of Carried Int. | 0 | 0 | 0 | 0 | 1 |
All transactions are entered as positive numbers, even if they decrease a value.
FAQ
Q: Can I upload metrics?
A: Yes. Metrics can be uploaded manually or via transaction upload template. To upload a metric, do not enter symbols in the amount field (e.g. 03/15/2025 would become 03152025 and 1.42x would become 1.42).
Q: Can I reorder columns in Capital Accounts?
A: Yes. Column order is controlled via the index set during column creation.
Next Steps
- View the Ark PES Transaction and Report Mapping File.xlsx for a template and examples of how transactions and metrics are structured.
-
Once Transaction Types and Metrics are added, users can input their Transactions and Metrics in the Transactions tab.
-
Configure Capital Account Statements using the Setting Up Capital Account Reports in Report Configuration guide.
-
Coordinate metric uploads via your team or support.
If you need help, contact support@arkpes.com - we’re here to assist.