---
title: "Capital Calls & Distributions: Initiating, Reviewing, and Publishing"
description: Learn how to create, review, and send capital call and distribution notices to LPs using ark’s integrated mailings tool. This guide covers initiating a mailing, uploading transactions, applying merge fields, and publishing final communications.
---
[Skip to content](https://connect.arkpes.com/knowledge/capital-calls-distributions-initiating-reviewing-and-publishing#main-content)
English - United States
Show submenu for translations
[Submit a Ticket](https://connect.arkpes.com/knowledge/kb-tickets/new?hsLang=en-us) [My Tickets](https://connect.arkpes.com/tickets?hsLang=en-us)
[](https://connect.arkpes.com/knowledge?hsLang=en-us)
Open main navigation
Close main navigation
- English - United States
Show submenu for translations
- [Submit a Ticket](https://connect.arkpes.com/knowledge/kb-tickets/new)
- [My Tickets](https://connect.arkpes.com/tickets)
- [Email Ark Support](mailto:support@arkpes.com)
[Email Ark Support](mailto:support@arkpes.com)
Search the knowledge base
- There are no suggestions because the search field is empty.
1. [Ark Knowledge Center](https://connect.arkpes.com/knowledge?hsLang=en-us)
2. [Investor Communications](https://connect.arkpes.com/knowledge/investor-communications?hsLang=en-us)
3. [Capital Calls & Distributions](https://connect.arkpes.com/knowledge/investor-communications?hsLang=en-us#capital-calls-distributions)
# Capital Calls & Distributions: Initiating, Reviewing, and Publishing
This guide walks you through preparing, reviewing, and sending capital call and distribution notices using ark’s integrated mailings tool.
---
#### **Jump to a Section**
- [What You’ll Learn](https://connect.arkpes.com/knowledge/capital-calls-distributions-initiating-reviewing-and-publishing#what)
- [Who Can Use This Feature](https://connect.arkpes.com/knowledge/capital-calls-distributions-initiating-reviewing-and-publishing#who)
- [Before You Begin](https://connect.arkpes.com/knowledge/capital-calls-distributions-initiating-reviewing-and-publishing#before)
- [Step-by-Step: Creating a Capital Call or Distribution](https://connect.arkpes.com/knowledge/capital-calls-distributions-initiating-reviewing-and-publishing#step1)
- [Step-by-Step: Adding Transactions & Merge Fields](https://connect.arkpes.com/knowledge/capital-calls-distributions-initiating-reviewing-and-publishing#step2)
- [Step-by-Step: Reviewing and Publishing the Mailing](https://connect.arkpes.com/knowledge/capital-calls-distributions-initiating-reviewing-and-publishing#step3)
- [Best Practices](https://connect.arkpes.com/knowledge/capital-calls-distributions-initiating-reviewing-and-publishing#best)
- [FAQ](https://connect.arkpes.com/knowledge/capital-calls-distributions-initiating-reviewing-and-publishing#faq)
- [Next Steps](https://connect.arkpes.com/knowledge/capital-calls-distributions-initiating-reviewing-and-publishing#next)
---
#### **What You’ll Learn**
By the end of this guide, you’ll be able to:
- Set up and configure mailings for capital calls and distributions
- Upload and merge custom transaction data into notices and emails
- Review and publish capital call and distribution batches to investor contacts
---
#### **Who Can Use This Feature**
This feature is available to:
- Ark Client Admin users
- Basic Admin users with fund access
---
#### **Before You Begin**
Make sure the following steps are completed before initiating the mailing, more details can be found in the [Preparing Capital Calls & Distributions: Mailings Templates & Folder Setup](https://connect.arkpes.com/knowledge/preparing-capital-calls-distributions-mailings-templates-folder-setup?hsLang=en-us) guide.
- Confirm all investor contacts are **ACTIVE** (Pending and Inactive contacts will not receive emails).
- Ensure **Capital Call** and **Distribution** folders are created and permissioned in the **Document Repository**.
- Verify any **CC emails** are set up under the **Client Configuration** or request Ark support to add them.
- Prepare the three required mailing templates:
1. Word document for the notice (with merge fields)
2. Word document for the email body (with merge fields)
3. CSV file with transactions and any custom merge fields
---
#### **Step-by-Step: Creating a Capital Call or Distribution**
1. Go to the **Capital Calls or Distributions** tab under **Mailings** in the Admin Portal.
2. Click **+ Start New Capital Call/Distribution**.
3. Enter a **Name** for the mailing (this displays on the LP portal).
4. Select the **Fund** associated with the call/distribution.
5. Assign one or more **Reviewers** (users who must approve the batch before sending).
6. Upload the **Notice Template** and **Email Template**.
7. Click **Save**, then **Continue to Add Transactions**.
---
#### **Step-by-Step: Adding Transactions & Merge Fields**
1. Click **+ Add New Transaction** in the Transactions step.
2. Choose one of the following options:
- **Add Single Transaction**: Manually input individual entries.
- **Upload From Template**: Upload a .CSV with all transactions and custom fields.
3. Once uploaded, review transactions using the **View** button.
4. Click **Save and Continue** to generate notice PDFs - one per transaction - into the unpublished document folder.
**Note:** Document filenames will follow this format:
`Fund Name - Investor Name - Capital_Call/Distribution Date`
---
#### **Step-by-Step: Reviewing and Publishing the Mailing**
1. Go to the **Review Documents** tab.
2. Preview notices, recipient lists, and email text.
3. Approve at least one document in the batch to proceed.
4. Once documents are approved:
- Click **Submit for Review** (if you're the preparer).
- Reviewers must approve at least one document to enable publishing.
5. Click **Publish and Email** to: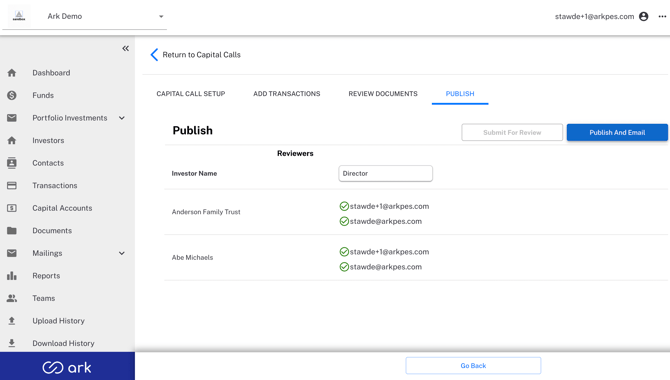
- Publish the final notices to the document repository.
- Send emails to all active investor contacts.
---
#### **Best Practices**
- Run a test batch with dummy fund/investor/contact records to confirm template setup.
- Use merge fields like ``, ``, and `` for dynamic personalization.
- Upload only active investors with properly permissioned contacts to avoid delivery errors.
- Avoid placing contacts in both the main role and CC role for a notice - they’ll receive duplicate entries.
---
#### **FAQ**
**Q: Can I edit a batch after submission but before publishing?**
Yes. The original preparer can make changes by returning to any step in the process. Once changed, these will need to be reviewed again.
**Q: What if some documents don’t generate?**
Ensure those investors have contacts with the correct **Capital Call** or **Distribution** role in active status.
**Q: Can I include percentages or text in notices?**
Yes. Use additional custom fields in the CSV upload and reference them with merge tags in the notice template.
---
#### **Next Steps**
- Review the [Preparing Capital Calls & Distributions: Mailings Templates & Folder Setup](https://connect.arkpes.com/knowledge/preparing-capital-calls-distributions-mailings-templates-folder-setup?hsLang=en-us) guide for template formatting.
- Track email delivery under **Reports \> Email Delivery Audit**.
- For questions or support, reach out to **[support@arkpes.com](mailto:support@arkpes.com)**.
- [NEW Portfolio Investments](https://connect.arkpes.com/knowledge/new-portfolio-investments?hsLang=en-us#main-content)
- [Portfolio Investment Uploading Guides](https://connect.arkpes.com/knowledge/new-portfolio-investments?hsLang=en-us#portfolio-investment-uploading-guides)
- [Client Management](https://connect.arkpes.com/knowledge/client-management?hsLang=en-us#main-content)
- [Client Portal Setup](https://connect.arkpes.com/knowledge/client-management?hsLang=en-us#client-portal-setup)
- [Branding & Communication Settings](https://connect.arkpes.com/knowledge/client-management?hsLang=en-us#branding-communication-settings)
- [Transaction & Metric Mapping](https://connect.arkpes.com/knowledge/client-management?hsLang=en-us#transaction-metric-mapping)
- [Report Configuration](https://connect.arkpes.com/knowledge/client-management?hsLang=en-us#report-configuration)
- [Feature Configuration](https://connect.arkpes.com/knowledge/client-management?hsLang=en-us#feature-configuration)
- [Client Onboarding & Go-Live](https://connect.arkpes.com/knowledge/client-management?hsLang=en-us#client-onboarding-go-live)
- [Data & Transaction Management](https://connect.arkpes.com/knowledge/data-transaction-management?hsLang=en-us#main-content)
- [Transactions & Metrics](https://connect.arkpes.com/knowledge/data-transaction-management?hsLang=en-us#transactions-metrics)
- [Fund Allocations](https://connect.arkpes.com/knowledge/data-transaction-management?hsLang=en-us#fund-allocations)
- [Document Management](https://connect.arkpes.com/knowledge/document-management?hsLang=en-us)
- [Financial Management](https://connect.arkpes.com/knowledge/financial-management?hsLang=en-us#main-content)
- [General Ledger & Chart of Accounts](https://connect.arkpes.com/knowledge/financial-management?hsLang=en-us#general-ledger-chart-of-accounts)
- [Journal Entries & Entity Tagging](https://connect.arkpes.com/knowledge/financial-management?hsLang=en-us#journal-entries-entity-tagging)
- [Bank Integrations](https://connect.arkpes.com/knowledge/financial-management?hsLang=en-us#bank-integrations)
- [Cash Receipts](https://connect.arkpes.com/knowledge/financial-management?hsLang=en-us#cash-receipts)
- [GL Reports & Reporting Tools](https://connect.arkpes.com/knowledge/financial-management?hsLang=en-us#gl-reports-reporting-tools)
- [Fund & Investor Management](https://connect.arkpes.com/knowledge/fund-investor-management?hsLang=en-us)
- [Investor Communications](https://connect.arkpes.com/knowledge/investor-communications?hsLang=en-us#main-content)
- [Capital Calls & Distributions](https://connect.arkpes.com/knowledge/investor-communications?hsLang=en-us#capital-calls-distributions)
- [General Mailings](https://connect.arkpes.com/knowledge/investor-communications?hsLang=en-us#general-mailings)
- [Product Updates](https://connect.arkpes.com/knowledge/product-updates?hsLang=en-us#main-content)
- [Release Notes](https://connect.arkpes.com/knowledge/product-updates?hsLang=en-us#release-notes)
- [User & Access Management](https://connect.arkpes.com/knowledge/user-access-management?hsLang=en-us#main-content)
- [Admin Users & Teams](https://connect.arkpes.com/knowledge/user-access-management?hsLang=en-us#admin-users-teams)
- [Contacts & Impersonation](https://connect.arkpes.com/knowledge/user-access-management?hsLang=en-us#contacts-impersonation)
- [Authentication & Login](https://connect.arkpes.com/knowledge/user-access-management?hsLang=en-us#authentication-login)
- [Audit & Activity Reporting](https://connect.arkpes.com/knowledge/user-access-management?hsLang=en-us#audit-activity-reporting)
- [LP Portal](https://connect.arkpes.com/knowledge/lp-portal?hsLang=en-us)
[](http://arkpes.com)
[mailto:support@arkpes.com](mailto:support@arkpes.com)
Copyright © 2025, Ark PES